How to brew coffee and not burn down your house
NOTE: This post makes a lot of product recommendations; links are affiliated.

Coffee by @fdiotalevi on Flickr
I was a fan of drip coffee...at least until I almost burned down my house.
Drip coffee is, generally speaking, awesome. It's easy (you can set it up the night before), high volume (for those groggy mornings), and the hot plates keep it warm for hours (great on weekends).
Fire risk from a brewer was never something I really considered. I had been using the Cuisinart Brew Central for several years. I liked that it had a built in water filter, auto-start timer, and an adjustable hot plate temperature so your coffee wouldn't turn into motor oil too quickly.
Then one rainy Sunday morning last year, we were well into the dregs of a pot. I had just poured a final cup and was walking away when I heard a loud series of pops. I turned and saw smoke billowing from the brewer! The damn thing caught on fire!
I unplugged it and tossed it outside in the rain to put it out.
Can you imagine what would have happened if I was out of the room when it happened? What if I was out of the house? I would have no more house, that's what.
I promptly decided that hot plates in coffee makers are a really bad idea. Indeed, if you read the 1-star reviews of the Cuisinart, I am not the only one that has had it catch fire. Most other brewers with hot-plates have similar "holy-shit-it-caught-fire" reviews.
So I decided to switch to a thermal carafe brewer. The idea is that the coffee brews directly into an insulated carafe that keeps the coffee hot without having it sit over a hot plate. Not only would this reduce the risk of fire, but the added benefit would be better tasting coffee since it wouldn't continue to "cook" and concentrate on the hot plate. I went with the Zojirushi Fresh Brew Thermal Carafe Coffee Maker because I have had good luck with other Zojirushi products.
The reviews of the Zojirushi were definitely hit or miss, and I was prepared for a coffeemaker with quirks. Sadly, the quirks were too great. I messed with this thing for months on end and finally gave up on it. The water doesn't brew at high enough temperature so the coffee isn't very good, the thermal carafe doesn't keep the coffee hot, and the lid is difficult (sometimes near impossible) to open for pouring. So it's safe but sucky. It was time to try something else.
And so began a multi-month obsession with identifying a coffee making system that would meet all my needs:
- Make high-quality coffee
- Make a large volume
- Keep it hot
- Not burn my house down

After exhaustive research, I concluded that the one and only coffee maker in existence that meets all my needs is the Technivorm Moccamaster. And while I know someone that has this device and attests to it's epic abilities, I couldn't bring myself to spend $300 on a drip coffee maker.
To be fair tho, the Moccamaster is more than a "drip" maker...it's really an automated-pour-over-maker.
What's pour-over, you ask? Just as it sounds - you pour water over the grounds to make coffee.
Isn't that the same as drip, you ask? No, NO, NOOOOOO! The differences are brewing time, brewing temp, and saturation.
- Time: it's slightly faster
- Temp: it's hotter
- Saturation: directed extraction
I used to think of this technique as fussy (and it is), but I decided to give it a shot. I did a direct comparison between drip and pour-over where all factors I could control were equal, including the water quality, the coffee quality (fresh, locally roasted Larry's), and the grounds-to-coffee ratio and volume.
Much to my surprise, the difference between the two is astounding -- the drip tasted burnt and bitter, while the pour-over was bright and complex. We were immediate converts, and I did a #facepalm about not exploring pour-over years ago. Incidentally I also compared it to French press, and while I like French pressed coffee, the pour-over was clearly superior.
Once I had decided to up my coffee-making game to pour-over, I needed to assemble the components. I could have just bought the Moccamaster, but decided to save money and go piecemeal instead. Thus, the following four components were needed:
- Water boiler
- Filter holder
- Filter
- Thermal carafe
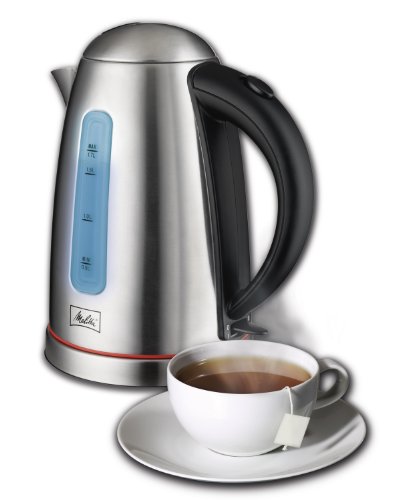
My first experiments with pour-over used water boiled in our teapot, but I found it difficult to handle. Most coffee nerds recommend the Bonavita 1-Liter Variable Temperature Digital Electric Gooseneck Kettle due to the spout’s ability to precisely saturate the beans. However, it had two dings against it for me: price and size; 1 liter simply isn't enough coffee for two people...or at least the two drinkers in my house. That's also why I passed over the Chemex brewer - it's just too small. I ended up going for this 1.7 Litre Melitta Kettle and am simply thrilled with it.
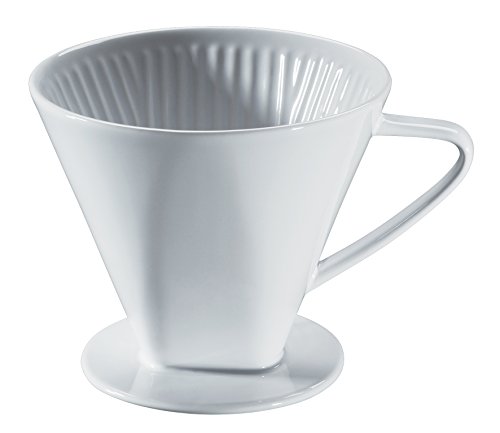
To hold the filter I started with this cheap plastic filter cone (at $10 it's hard to beat on price), but I'm not fond of putting boiling liquids in plastic. I switched to the Cilio Porcelain No. 6 Coffee Filter Holder which made me feel better and looks fancier (if that's important to you). I initially used Melitta #6 Cone Paper Filters, but found that they would inconsistently rupture and dump grounds into the pot. According to Amazon reviews, I wasn't the only one to have this problem with the Cilio holder, so I decided to spring for a "permanent" foil filter. I went with the Cilio #4 Cone Gold Plated Coffee Filter and, while smaller than the holder, works great and makes consistently excellent coffee. I figure if I can make it more than a year without busting the filter, I'll come out ahead.

Finally, the thermal carafe. I really wanted to get this Thermos carafe, but it wasn't big enough (I know, a theme, right?). Instead I purchased the Genuine Joe 2-Liter Vacuum Insulated Carafe, which has plenty of room and has turned out excellent.
The process is pretty simple:
- Boil water, preferably filtered
- Place filter in the holder
- Place the holder+filter on top of the open carafe
- Put coffee in the filter
- Slowly pour the post-boiled water (wait about a minute after boiling) over the grounds
There is more nuance to it than that, and coffee purists will howl that you need to weigh your beans to 1/100th of a gram, grind them with diamond tipped sharks teeth, and only brew with the tears of a pygmy displaced by coffee plantations. But seriously, just tinker with the technique, the grind, the amount of beans, and so on, until you get what you like. Then drink it up!
The last thing I'll mention is the coffee itself. If you love coffee, make an effort to source good beans. While Intelligentsia or Blue Bottle are super-premium (and priced as such), I urge you to seek out a local roaster. Boutique coffee roasters are popping up all over the country, much to the benefit of coffee lovers. I'm a huge fan of Larry's here in Raleigh. I have found a coarser grind works better for my system, but your results may vary. And for cryin out loud, invest in the Friis Coffee Vault to keep your beans tasting fresh.
To recap, my system is:
- Melitta 1.7 Liter Kettle ~$40
- Cilio Porcelain No. 6 Coffee Filter Holder ~$24
- Cilio #4 Cone Gold Plated Coffee Filter ~$30
- Genuine Joe 2 Liter Vacuum Insulated Carafe ~$15
I still might end up getting a Moccamaster eventually, but right now my system is making kick-ass coffee at a fraction of its cost.


